How To Insert Text Box In Google Docs? – SBD
23 September 2023
5 Mins Read

toc impalement
If you are a working professional, sending different types of texts and documents might be something you do every day.
But, not all information seems to appeal through texts alone. Adding a little visual pinch will let your team better understand what you want to relay. A visual representation of your message gives you a better path to effective communication that helps you take a slingshot through difficult situations.
Yes, inserting text boxes into your Google Docs will make your Google Docs look dynamic to whoever reads it. But how do I insert text boxes in Google Docs? Well, I can help you with that. Read this article completely to get the answer you are looking for.
What Are Text Boxes Used For In A Word Processing File?

A text box in a word processing unit is a tool that allows users to add texts within a specific area of the document. It does not have to be Google Docs alone. Most of the word processing software different working professionals and offices use has the feature of adding text boxes.
They are great for helping you create a perfectly clear document and algorithm. Although any word processing software allows you to create obvious texts, you can use a text box to designate a particular text to one specific place.
How Does Google Docs Text Boxes Help?
Text boxes are helpful. They can help you out quite a lot. Go through these simple use cases to find out how to use them.
Move Text: Wouldn’t it be helpful to be able to move your texts around as you move around your images? You can select the text box and move the Text around on the Word document.
Organize Information: You can make your work presentation look cool. Text boxes help you organize the information and highlight or help you focus on a particular text.
Separate Information: If you have to make one piece of information stand out, then text boxes are a great tool. They can help you separate the information you want to keep separate.
How To Add A Text Box In Google Docs?

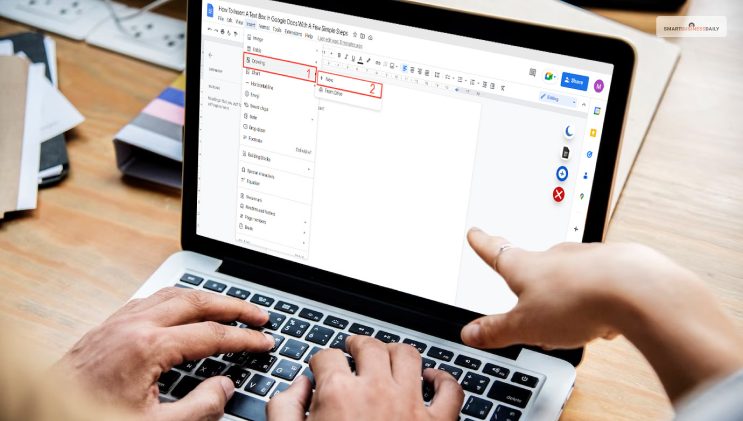
Click on the button reading “insert”. Now go to the option that reads “Drawing,” and following that, open the option called New. After that, click on the “text box” icon after that. So, here is the step one –
Step 1: Go To The Toolbar
Across the top of the Google Docs toolbar, you must click on the link reading Insert. There, a dropdown option will open, allowing you to add a text box. Now you have to choose the option Drawing and select the option called “New.” this will make a checkered screen pop up. You will use this checkered screen to draw a text box.
Step 2: Look For The Text Box Icon
Click on the text box icon within the drawing tool. You will see an icon that looks like a T inside a box. This is the drawing tool for adding a text box. For this step, you must choose to draw a text box.
Step 3: Create Your Text Box
Now, you start by clicking on any place on the checkered screen to draw your checkbox. You can literally drag the cursor around to create the type of size and shape you want to create for your text box. There must be an option to resize the text box, and it should be around the corner. You can use it to resize the box according to your needs. Then, you can fill in the box with the type of Text you want to add to it.
Step 4: Fill The Box With Colors
You will also see a paint bucket. This will help you change the colors of the text box and make it look more appealing. When someone asks how to insert text boxes in Google Docs, it is the most satisfying step that I want to help them learn. You can fill the text box with whatever color you like. First, you must click on the pencil icon and select a desired color.
Step 5: Save & Close
If you are also using a text box and cheating one as I walk you through the process, then you must have liked picking up your favorite color. Once you have picked up the color you want, you must select Save & Close. This way, you will successfully add the text box to the document.
Step 6: Resize & Relocate
So you have chosen the right shape, filled in the text box with the right color, and resized it accordingly. But do you want to move it around? Surely, you can move the text box around if you want.
How? You have to use the cursor to drag the shape and place it wherever you want. There is also an option for you to resize the text box. It should be on the corner of the text box you want to resize. You can pull the corner part of the text box to resize it.
How To Remove A Text Box In Google Docs?
I have given you the step-by-step process for how to add a text box in Google Docs. But what if you do not need one? Yes, you might also want to remove the text box from Google Docs. Here are the steps for that –
- Open one of your Google Slides Presentation
- Select the text box you want to remove on the Google
- At the top corner, click on the option reading Edit.
- Now click on the Delete option.
Bottom Line
If you are thinking of creating an attractive document that not only informs your teams but also visually communicates, you can use text boxes. You can use a text box to draw attention to the necessary information on your document. You do not always have to use PowerPoint or Google Slides. If you like working on a word processing document, then Google Docs is enough to create those visual elements for you.
Once you follow the simple step-by-step process provided in this article, you will easily add text boxes in Google Docs. Did you find this article helpful? Please let us know your concerns through the comment section. Thank you for reading this article.
Read Also:


Comments Are Closed For This Article