


Say Goodbye To Apple Cash Frustration: Learn How To Transfer Apple Cash To Bank
03 February 2025
6 Mins Read
toc impalement
So, how to transfer apple cash to bank?
Ever find yourself wondering what to do with all that Apple Cash? You know, the money you’ve been saving to share with friends or those oh-so-satisfying cashback rewards? Well, look no more! This step-by-step guide will show how easily you can put that Apple Cash into your bank account.
Whether you need that cash for a big purchase, want to save it for a rainy day, or just prefer to keep your money in one place, transferring is a breeze. We’ll break it down step-by-step, so even if you’re not tech-savvy, you’ll have that money in your bank account quickly.
So, pull out your phone, and let’s get into it! We’ll cover everything you need to know, from how to transfer Apple cash to a bank account to avoid pesky fees, and we’ll even answer some questions you might have. By the end of this guide, you will be an Apple Cash transfer pro!
What Is Apple Cash?
Before diving into how you transfer Apple cash to your bank account, let’s quickly cover what Apple Cash is. Apple Cash is a digital card in your Apple Wallet that acts like a debit card.
If the retailer accepts Apple Pay, you can purchase it in-store, online, or within apps. That also comes in handy when you need to split bills with people, pay back friends, or even receive payment.
If you have accumulated a balance you want to spend outside of an Apple ecosystem-related device, it would be in your best interest to transfer that to your bank account.
Why Transfer Apple Cash to a Bank Account?
There are several reasons you might want to transfer Apple Cash to your bank. Let us go through these reasons to have better understanding of the overall process:
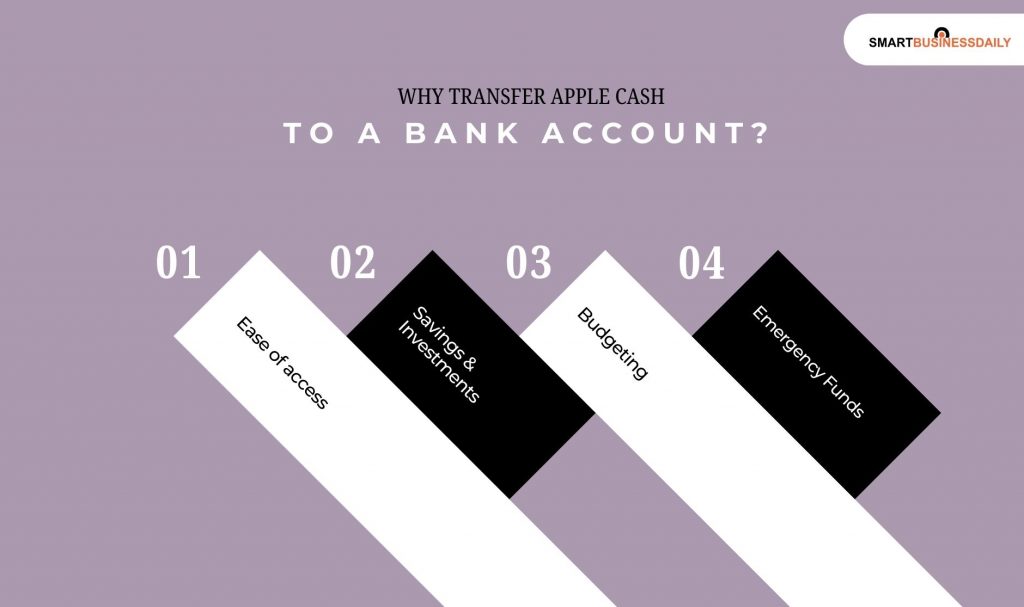
- Ease of access: Once the money has reached your bank, you can take it out as cash or use it anywhere your bank’s debit or credit card is accepted. Such accessibility might simplify your day-to-day dealings and ensure you never find yourself stuck without money when needed.
- Savings and Investments: Unlike a traditional savings account, Apple Cash doesn’t earn interest. You can put the money in your bank and start using interest-earning accounts, or you could invest the money to make your money grow over time.
- Budgeting: Keeping track of finances is complicated by having money spread everywhere. By consolidating money in a single location—one’s bank account—it is easier to track spending, follow budgets, and achieve financial goals.
- Emergency Funds: Unexpected situations often require quick access to cash. Transferring your Apple Cash to your bank ensures you have resources available for any urgent needs or unforeseen expenses.
How To Transfer Apple Cash To Bank: The Step-By-Step Guidance
Here is the step-by-step guide on transferring Apple Cash to your bank account. It is easy and only takes a few minutes.
Step 1: Launch the Wallet app
The first step is to open the Wallet app on your iPhone or iPad. Make sure you’re signed in with your Apple ID.
Step 2: Choose Your Apple Cash Card
In the Wallet app, find your Apple Cash card. It should show your current balance on the screen.
Step 3: Tap on the “Transfer to Bank” Option
Once on the Apple Cash card screen, tap the “More” button (three dots) in the upper-right corner. Select “Transfer to Bank” from the menu.
Step 4: Amount to be entered
Input how much you’d like to transfer into it, whether that is the full available or simply some of it—the choice is easy when Apple makes checking your available balance so simple:
Step 5: Select Your Transfer Speed
Apple offers you two ways to transfer money:
- Instant Transfer: This transfers the money to your bank within minutes but with a small fee (typically 1.5% of the transfer amount, with a minimum of $0.25 and a maximum of $15).
- Standard Transfer: This is free but takes 1-3 business days to process.
Select the option that best suits your needs. Instant Transfer is a great choice for emergencies, while Standard Transfer is perfect if you’re not in a rush.
Step 6: Verify Your Bank Account
If this is your first time transferring Apple Cash to your bank, you must add a bank account. Enter your bank’s routing and account numbers, then confirm the details. Once saved, you can select this account for future transfers.
Step 7: Review and Confirm
Review details before completing a transfer. The final step will ask if the transfer needs to be set; tapping on Transfer completes it.
Step 8: Verify the Status
Once you confirm a transfer, you can check its status in the Wallet app. Go back to your Apple Cash card and look for the transaction history.
Tips for Using Apple Cash Wisely

Transferring Apple Cash to your bank is just one aspect of managing your finances. Here are some tips to get the most out of your Apple Cash:
- Keep Track of Transactions: Regularly review your Apple Cash transaction history to ensure all charges are accurate. This habit can help you catch errors or unauthorized payments early.
- Set Savings Goals: If you’re transferring Apple Cash to a savings account, set specific goals to motivate yourself. Whether building an emergency fund or saving for a big purchase, having clear targets can keep you on track.
- Avoid Instant Transfer Fees: Plan your transfers in advance to avoid paying the 1.5% fee for Instant Transfers. Use Standard Transfer whenever possible to save money.
- Use Apple Cash for Daily Purchases: Maximize convenience by using Apple Cash for groceries, coffee runs, or dining out. It’s convenient for splitting bills with friends and can keep your other payment methods free for larger transactions.
- Enable Family Sharing: If you manage the family finances, consider using Family Sharing to share Apple Cash with your family members. This feature makes shared expenses much easier and ensures everyone can access the funds when needed.
- Avoid Penalties and Late Fees: You can use Apple Cash to transfer funds to your bank to avoid penalties or late fees by making timely payments of bills or meeting minimum balance requirements for your account.
Common Questions About Transferring Apple Cash to Bank
You can transfer Apple Cash to your U.S. bank account that accepts ACH (Automated Clearing House) transfers. Just be sure to enter your bank information correctly
Yes, there are transfer limits for Apple Cash. You can transfer up to $10,000 at a time and up to $20,000 within a 7-day period. These limits may vary based on your account activity.
Standard transfers typically take 1-3 business days. Delays may happen if there’s a bank holiday or your bank needs extra verification.
Once a transfer is started, it cannot be stopped. Please review all details carefully before submitting.
Standard transfers are free, but Instant Transfers carries a tiny charge (1.5% of the amount transferred with a minimum of $0.25).
Wrapping Up!
Transferring Apple Cash to your bank account is simple and ensures the money is where you need it most. You could be saving, budgeting, or even preparing for that rainy day; moving the funds to the bank gives you much more control over your finances.
Follow the steps in this how-to guide to master how to transfer apple cash to bank with simplicity.
Now that you know the ropes, you can make the most of your Apple Cash and enjoy the flexibility it offers. Happy transferring!
ADDITIONAL READING:


Related Articles


Comments Are Closed For This Article