How To Import OST Emails To Office 365 (Step By Step)
5 Mins Read
Published on: 23 June 2023
Last Updated on: 01 July 2023

toc impalement
Outlook is a popular corporate communication tool widely used in organizations. However, the recent rise of cloud apps like Office 365 has changed the enterprise workspace game. Advanced cloud-based tools have helped organizations boost collaboration and eventually increase productivity. As such, people who were using tools like Outlook in the past have shifted to the Office 365 platform to avail these benefits.
If you, too, are planning to make this shift, you will first need to transfer your Outlook OST files to Office 365 for continuity, convenience, and various other reasons. In this blog post, we have discussed different ways to import OST file into Office 365.
How To Import OST Files Into Office 365?
1. Use The Export Feature Of MS Outlook
Outlook stores data in OST files that are directly synchronized with the Microsoft server. A major problem with OST files is that you can’t transfer them between computers or platforms. If you want to open an OST file in Office 365, you need to convert it into PST format first. Thereafter, you can import it to Office 365.
Here are the steps you need to follow to convert OST files into PST format:
1. Open Outlook on your computer
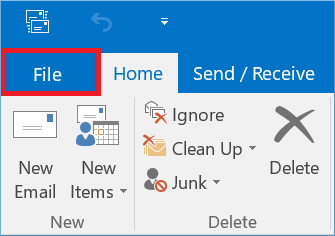
2. Click on File
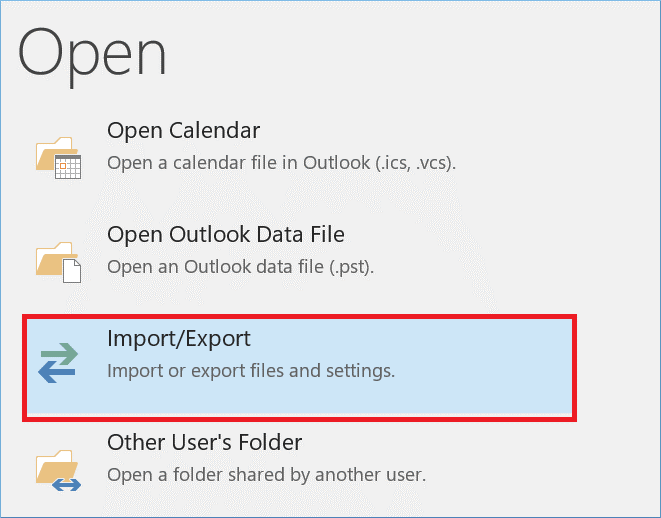
3. In the File menu, click Import/Export
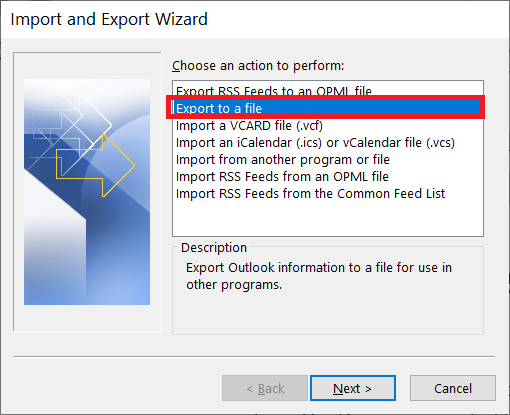
4. Select the Export to File option and then click on Next
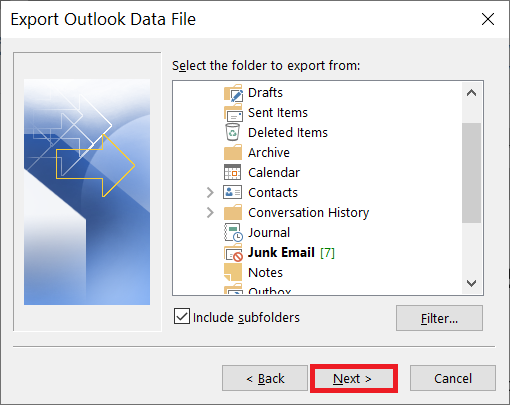
5. Select Email or folder
6. Check the Include Subfolder option and then click on Next
7. Browse to the location where you want to store PST file
8. Check the option – Replace duplicates with items imported
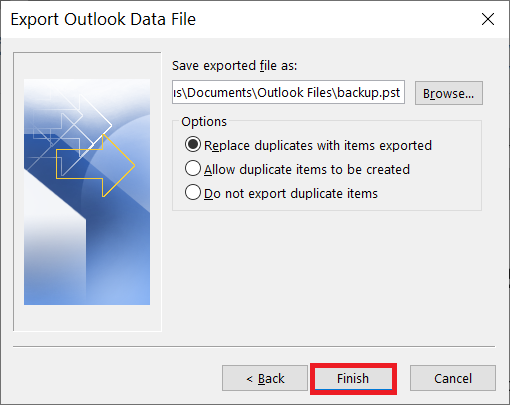
9. Click Finish
Note: You need to be connected to the Exchange server for this method to work. If your Exchange server is offline, you can use automated conversion tools to convert OST files into PST format.
2. Create A New PST File And Copy OST Emails Into It
1. Launch the MS Outlook application
2. Click New Items -> More Items, which is presented as the last option
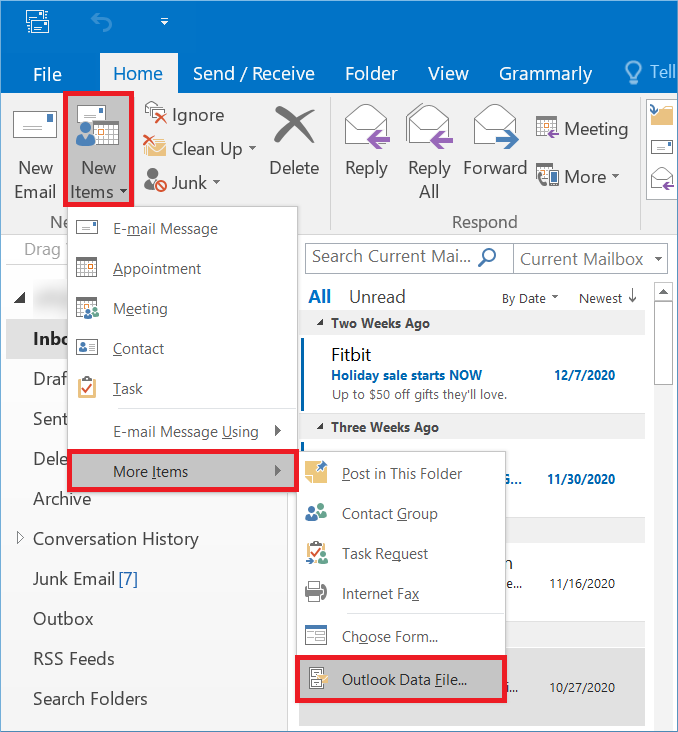
3. Select Outlook Data File from the submenu. This option will generate a new PST file. After this, you can move data to the new folder
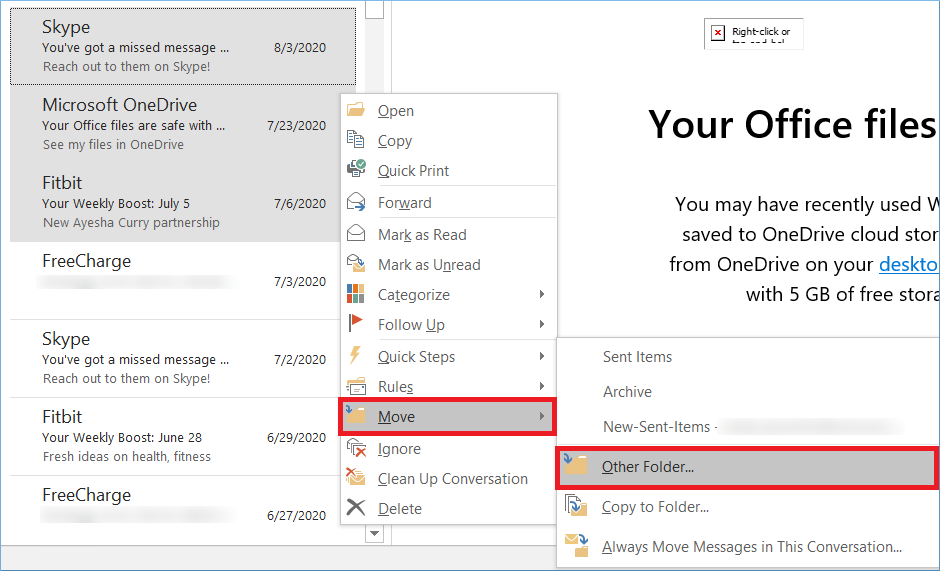
4. Choose the emails you wish to move, right-click on them and select Move
5. Then click Other Folder
6. Choose the new data file folder that you just created
7. Click OK
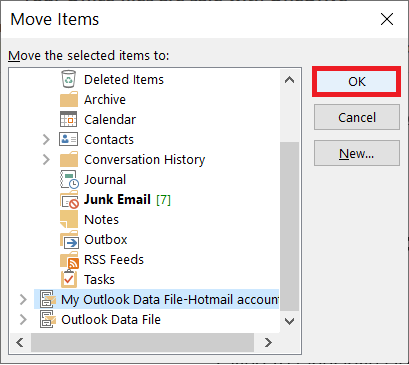
8. Again, click OK to initiate the copy process
3. Use Automated Software To Import OST Files To Office 365
If you find the above methods lengthy and time-consuming, you can use an automated solution like OST Stellar Converter that can help you import OST files into Outlook 365 in a very short time with a few steps.
Here are the steps you need to follow.
1. Download Stellar Converter for OST and install it on your computer
2. You can go with default options when installing the software
3. After the software is installed, launch it
4. In your Home tab, click Select Outlook data file
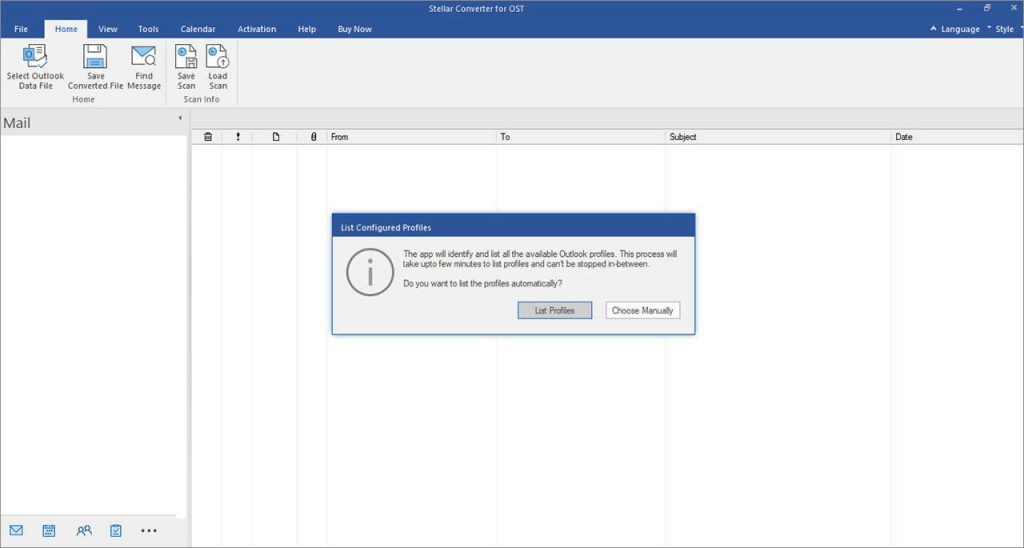
5. A pop-up dialog box will appear on the screen that will provide the option to list profiles automatically or choose manually
6. The List Profile option presents all the stored OST files at the default location under the Profile List tab. You can select the OST file from the list and click Convert. You may also click Choose Manually to browse manually
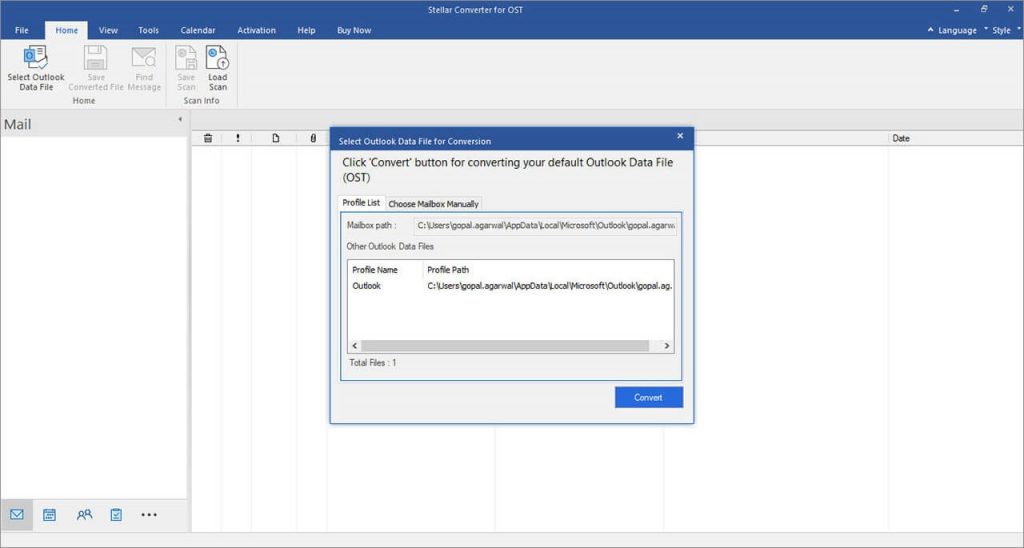
7. Now the tool will start converting the OST file, and when the conversion is completed, you will see a Preview window
8. In this window, you will be able to see the Outlook Mailbox folder and deleted items (marked in red color) in the Left pane. You can click on Mail items to see their content and then select the mail items for saving.
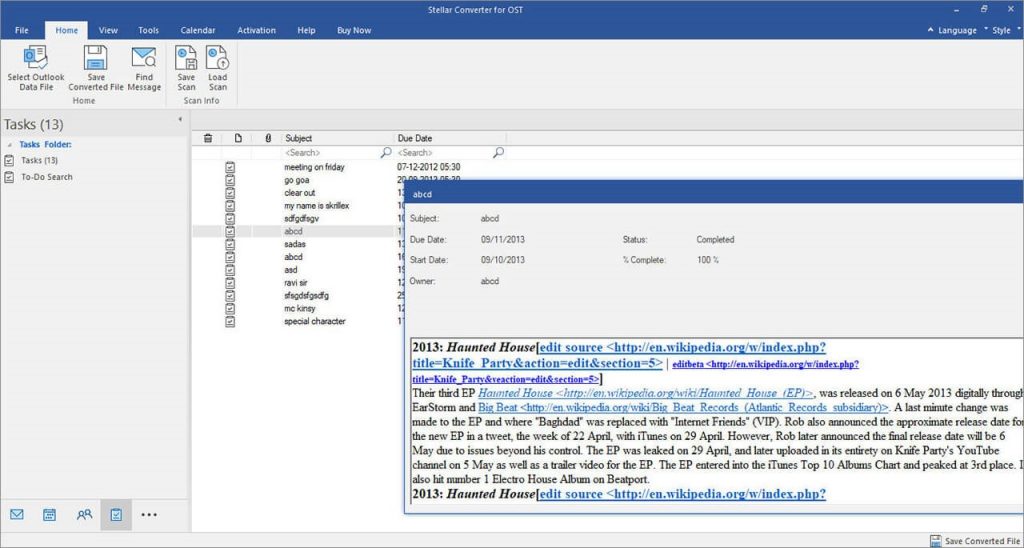
9. OST Stellar Converter allows you to select and import OST files into Outlook 365. This option is useful if you do not want to import an entire communication database to the new platform that can consume valuable space in your cloud account
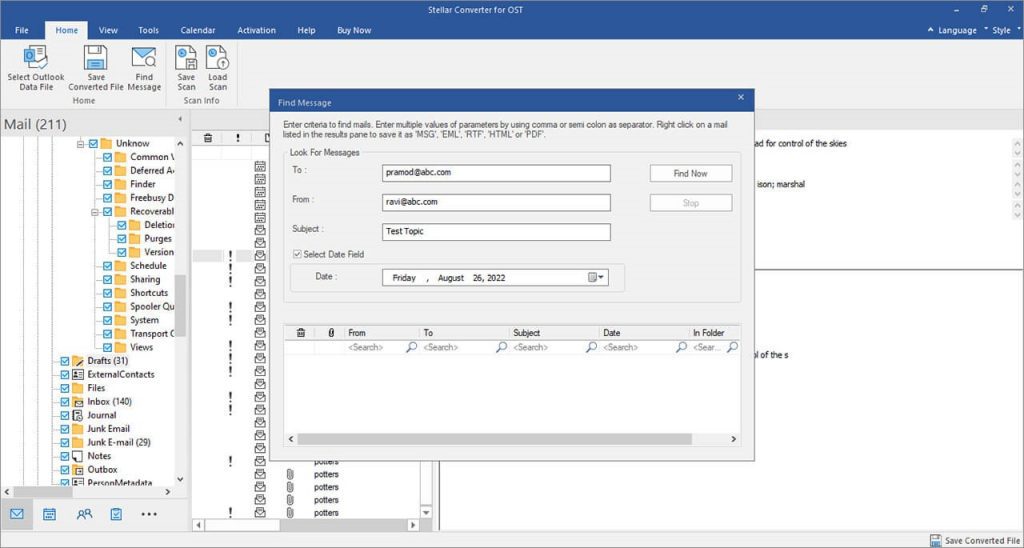
10. You can use the Find Message option to search emails. The search feature provides various search parameters like Date, Subject, From, To, etc., to conduct the search. You can save emails individually or in a group
11. Under the Home Tab, click Save Converted File
12. A pop-up screen will appear, providing options for different file formats. Select PST and then click on Next
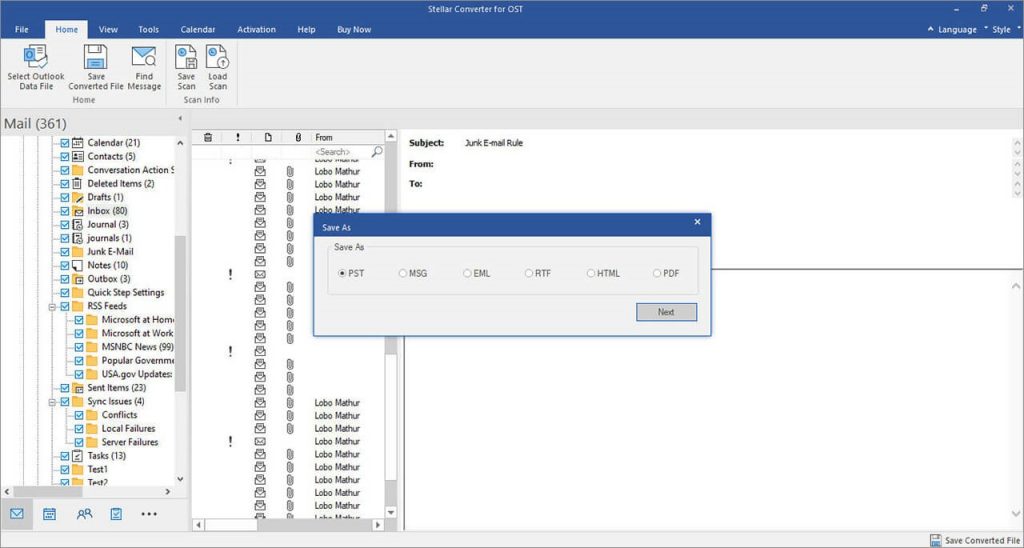
13. Click on Save Converted File under the Home tab. A pop-up screen will appear with file formats to save the extracted mailbox data. Select PST and click on Next
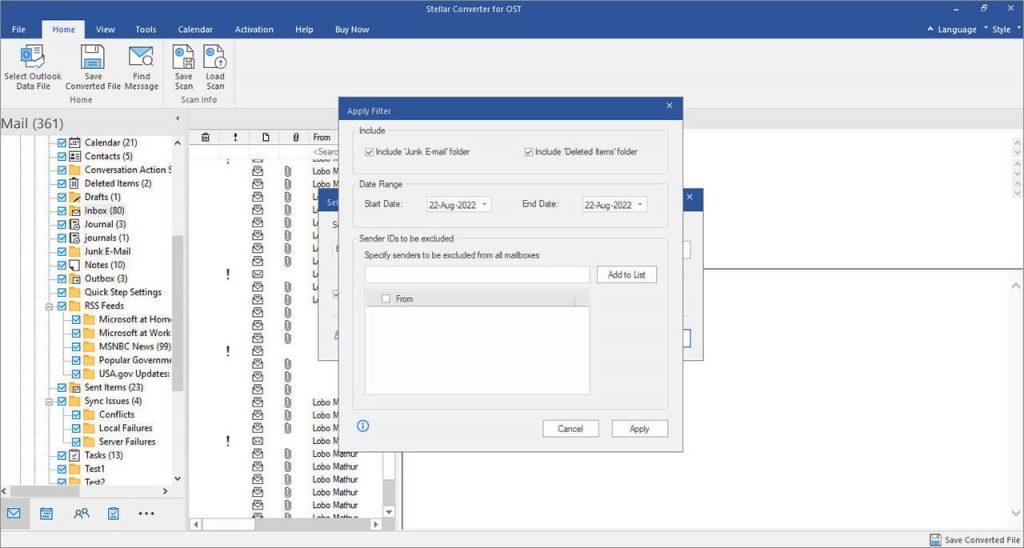
14. Click Browse and navigate to a desired location. After selecting the save location, you will get an option to select or unselect Restore Deleted items and Auto split PST files options based on your needs. You can also click on Apply Advanced Filter link to apply filters
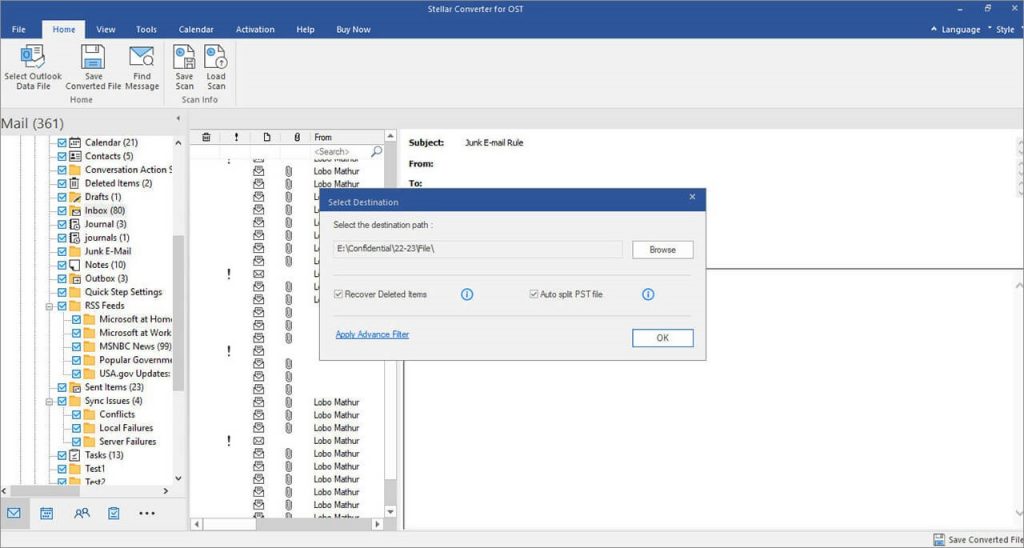
15. Click OK
16. If you click on Apply Advanced Filter, a new dialog box appears where you can select the option to include or exclude mail items on email ID and date range
Wrapping Up
You can follow any method given in this blog post to open an OST file in Outlook 365. However, you should keep in mind that the manual conversion method doesn’t provide you with the option to import selected mails to the new platform, whereas Stellar Converter for OST gives you complete control when it comes to importing OST files in Office 365. Also, the graphical user interface of the software makes the whole task relatively easy, even for novice users.
FAQs
Is There Any Limit To The Number Of OST Emails You Can Convert With The Software?
No, there is no limit on the number of OST emails you can convert with the software. The converter software automatically splits large or oversized PST files at approximately 45GB while saving the converted OST files. This helps in preventing the corruption of large PST files.
How Can You Save Space If You Have A Huge Number Of OST Emails To Upload?
The Technician edition of the OST Stellar Converter allows you to compress large PST files. The converter software also allows you to extract and save the attachments in different folders while preserving the interlinks that help reduce the size of the PST file.
Can The Software Import Encrypt OST Emails To Office 365?
Yes, the converter software can successfully convert your encrypted OST emails into PST and allow you access complete mailbox data.
Read Also:


Comments Are Closed For This Article